Welcome to the world of Django Rest Framework (DRF)! In this Article, we will cover the basics of getting started with DRF and build our first API. DRF is a powerful toolkit for building web APIs using Django. It provides a wide range of features that make it easy to build RESTful APIs, including serializers, views, routing, authentication, and documentation. DRF is a third-party package that can be easily installed using pip and integrated with your existing Django project.
1: Getting Started with Django Rest Framework
I assumes that you have a basic understanding of Python and Django. If you are new to Django, I recommend that you first learn the basics of Django before diving into Django REST framework.
Introduction:
In this article, we will cover the following topics:
Installing Django Rest Framework: We will start by installing DRF and configuring it in our Django project.
Serializers: We will explore serializers, which are used to convert complex data types into Python data types that can be easily rendered into JSON or other content types.
Views: We will dive into views, which are the building blocks of our API. We will look at some of the built-in views provided by DRF and learn how to create our own views.
Routing: We will cover the basics of routing in DRF and learn how to define URL patterns for our views.
Authentication: We will explore the different authentication schemes provided by DRF and learn how to add authentication to our API.
Documentation: We will look at the built-in documentation provided by DRF and learn how to customize it for our API.
By the end of this article, you will have a solid understanding of the basics of DRF and be able to build your first API. So let’s get started!
What is Django Rest Framework?
Django Rest Framework (DRF) is a third-party package for Django that provides a powerful toolkit for building web APIs. DRF is built on top of Django’s class-based views and serializers, making it easy to build APIs that follow the REST architectural style.
REST stands for Representational State Transfer, and it’s an architectural style for building web services. In a RESTful API, resources are represented as URLs, and clients can perform CRUD (create, read, update, delete) operations on those resources using HTTP methods (GET, POST, PUT, DELETE).
DRF is designed to make it easy to build APIs that follow RESTful principles. It provides a range of features that simplify the process of building APIs, including:
Serialization: DRF provides a powerful serialization framework that allows you to easily convert complex data types, such as Django model instances, into Python data types that can be easily rendered into JSON or other content types. Serializers also provide deserialization, allowing parsed data to be converted back into complex types after validation.
Views: DRF provides several built-in view classes that make it easy to build views for common use cases, such as listing and creating objects, retrieving and updating objects, and deleting objects. These views are designed to work with serialized data, and they provide a range of features, such as pagination, filtering, and authentication.
Routing: DRF provides a powerful router that allows you to easily define URL patterns for your API views. The router automatically generates URLs for your views based on their names and the HTTP methods they support.
Authentication: DRF provides a range of built-in authentication schemes, including basic authentication, token authentication, and JSON Web Token (JWT) authentication. These authentication schemes can be easily added to your API views using DRF’s authentication classes.
Documentation: DRF provides built-in documentation that makes it easy to generate documentation for your API views. The documentation is generated automatically based on your view classes and their serializers, and it can be customized using DRF’s documentation classes.
Overall, Django Rest Framework is a powerful toolkit for building web APIs that follow RESTful principles. It provides a range of features that make it easy to build APIs that are well-documented, well-tested, and easy to consume by other developers. Whether you’re building a small API for a personal project or a large API for a production system, DRF is an excellent choice for building high-quality, scalable APIs with Django.
Installation and setup
Before we can start building our API using Django Rest Framework, we need to install DRF and configure it in our Django project. In this section, we will cover the steps needed to install and configure DRF.
Step 1: Install Django Rest Framework
The first step is to install Django Rest Framework. DRF can be installed using pip, which is a package manager for Python. To install DRF, open your terminal or command prompt and run the following command:
pip install djangorestframeworkThis will install the latest version of DRF. If you want to install a specific version of DRF, you can specify the version number using the following command:
pip install djangorestframework==<version_number>Step 2: Add Django Rest Framework to INSTALLED_APPS
Once DRF is installed, we need to add it to the INSTALLED_APPS setting in our Django project’s settings.py file. This tells Django that we are using DRF in our project. To do this, open your project’s settings.py file and add the following line to the INSTALLED_APPS list:
# settings.py

INSTALLED_APPS = [
# other apps
'rest_framework',
]
Step 3: Configure DRF Settings
DRF provides a range of settings that can be customized to suit our needs. We can configure these settings in our Django project’s settings.py file.
Here are some common settings that you may want to customize:
DEFAULT_RENDERER_CLASSES: This setting specifies the default renderers that DRF should use for rendering responses. By default, DRF uses the JSONRenderer and BrowsableAPIRenderer classes. You can customize this setting to use other renderers if needed.
DEFAULT_PARSER_CLASSES: This setting specifies the default parsers that DRF should use for parsing requests. By default, DRF uses the JSONParser and FormParser classes. You can customize this setting to use other parsers if needed.
DEFAULT_PARSER_CLASSES: This setting specifies the default parsers that DRF should use for parsing requests. By default, DRF uses the JSONParser and FormParser classes. You can customize this setting to use other parsers if needed.
Here is an example of how to configure DRF settings in your project’s settings.py file:
# settings.py

REST_FRAMEWORK = {
'DEFAULT_RENDERER_CLASSES': [
'rest_framework.renderers.JSONRenderer',
'rest_framework.renderers.BrowsableAPIRenderer',
],
'DEFAULT_PARSER_CLASSES': [
'rest_framework.parsers.JSONParser',
'rest_framework.parsers.FormParser',
'rest_framework.parsers.MultiPartParser',
],
'DEFAULT_AUTHENTICATION_CLASSES': [
'rest_framework.authentication.BasicAuthentication',
'rest_framework.authentication.SessionAuthentication',
'rest_framework.authentication.TokenAuthentication',
],
}
Step 4: Include DRF URLs in urls.py
Finally, we need to include the DRF URLs in our Django project’s urls.py file. This tells Django which URLs should be handled by DRF.
To do this, open your project’s urls.py file and add the following line:

This will include the DRF URLs under the ‘api/’ URL path. You can customize this path if needed. And that’s it! Now you have DRF installed and configured in your Django project. In the next section, we will dive into the basics of DRF and build our first API.
Creating a basic API view
Now that we have DRF installed and configured, let’s dive into the basics of building an API using DRF. In this section, we will create a basic API view that returns a list of data in JSON format.
Step 1: Define a Serializer
Before we can create a view, we need to define a serializer. A serializer is used to convert complex data types, such as Django models, into Python data types that can be easily rendered into JSON or other content types. To define a serializer, create a new file called serializers.py in your Django app directory and add the following code:

In this example, we define a serializer for a model called MyData, which has three fields: id, name, and email. We use the serializers module to define each field as a serializer field.
Step 2: Define a View
Now that we have defined a serializer, we can create a view that uses the serializer to render data in JSON format. To define a view, create a new file called views.py in your Django app directory and add the following code:

In this example, we define a view called MyDataList that extends the ListAPIView class provided by DRF. We set the queryset to retrieve all instances of MyData and set the serializer_class to MyDataSerializer.
Step 3: Define a URL Pattern
Now that we have defined a view, we need to define a URL pattern that maps to the view. To do this, open your app’s urls.py file and add the following code:

In this example, we define a URL pattern that maps the ‘mydata/’ URL path to the MyDataList view. We use the as_view() method to convert the view into a callable view function that can be used in a URL pattern.
Step 4: Test the API
That’s it! Now we can test our API by running the Django development server and making a GET request to the ‘mydata/’ URL path. When we make a GET request to this URL, DRF will use the MyDataList view to retrieve the queryset and serialize it using the MyDataSerializer. The serialized data will be returned in JSON format.
Congratulations! You have created your first API view using Django Rest Framework. In the next section, we will explore more advanced features of DRF, such as authentication, pagination, and filtering.
2: Serializers and ModelSerializers
In this section, we will dive deeper into the core of DRF: serializers. Serializers are essential components of building APIs with DRF. They allow us to transform complex data structures into easily rendered content types, such as JSON, XML, or HTML. In this chapter, we will cover the basics of serializers, including the difference between serializers and model serializers, how to define serializers for custom data types, and how to validate data with serializers. We will also cover best practices for using serializers and provide examples of how to use them in real-world applications. By the end of this chapter, you will have a solid understanding of how to use serializers to build powerful APIs with DRF. Let’s get started!
What are serializers?
Serializers are the key components of Django Rest Framework (DRF). They allow us to convert complex data types, such as Django models, into simple data types that can be easily rendered into formats like JSON, XML, or HTML. Serializers play a crucial role in building APIs using DRF.
Serializers essentially perform two main tasks: serialization and deserialization. Serialization is the process of converting complex data types into simpler data types that can be easily rendered into a content type, such as JSON. Deserialization is the opposite process of taking data in a simple format, like JSON, and converting it back into a complex data type.
DRF provides two types of serializers: regular serializers and model serializers.
Regular serializers are used when we need to serialize or deserialize data that is not necessarily related to a database model. For example, if we have a dictionary of data that we want to convert to JSON, we can use a regular serializer to perform this task.
Model serializers, on the other hand, are used when we want to serialize or deserialize data that is related to a database model. Model serializers can take care of most of the common cases of serialization and deserialization for us. They are powerful tools that can be used to quickly create CRUD (Create, Read, Update, Delete) operations for our API views.
In the next section, we will dive deeper into the differences between regular serializers and model serializers, and how to use them to serialize and deserialize data in your DRF application.
Creating serializers for your models
Django Rest Framework provides a powerful tool to serialize and deserialize data in your application using ModelSerializers. With ModelSerializers, you can easily create serializers for your Django models and use them to build powerful APIs that can interact with your database.
To create a serializer for a model, you can define a new class that extends the ModelSerializer class provided by DRF. For example, let’s say you have a Django model called ‘Book’, which has fields for ‘title’, ‘author’, and ‘description’. To create a serializer for this model, you can define a new class like this:

In this example, we import the serializers module from DRF and our Book model from our application’s models.py file. We then define a new class called BookSerializer that extends the ModelSerializer class. The ‘class Meta’ attribute is used to define the metadata for the serializer. In this case, we specify the model to use for the serializer (Book) and the fields that should be included in the serialized data.
Now that we have defined our BookSerializer, we can use it to serialize and deserialize Book objects in our views. For example, to serialize a list of Book objects and return them as JSON, we can do the following in a view function:

In this example, we import the Book model and the BookSerializer from our application. We define a new view function called ‘book_list’, which returns a list of Book objects serialized as JSON. We use the BookSerializer to serialize the queryset of Book objects, and then return the serialized data in a Response object.
In conclusion, creating serializers for your Django models is an essential task when building APIs using Django Rest Framework. With ModelSerializers, you can quickly and easily create serializers for your models and use them in your views to serialize and deserialize data.
Using ModelSerializers for simpler serialization
ModelSerializers are a powerful tool provided by Django Rest Framework that allow for simpler serialization and deserialization of data related to a Django model. When using a ModelSerializer, you don’t have to write code to define each field of the serialized data manually. Instead, the serializer is generated automatically based on the fields of the model that it is associated with.
To use a ModelSerializer, you need to define a new serializer class that extends the ModelSerializer class provided by DRF. For example, let’s say you have a Django model called ‘Book’, which has fields for ‘title’, ‘author’, and ‘description’. You can define a serializer for this model as follows:

In this example, we import the serializers module from DRF and our Book model from our application’s models.py file. We then define a new class called BookSerializer that extends the ModelSerializer class. The ‘class Meta’ attribute is used to define the metadata for the serializer. In this case, we specify the model to use for the serializer (Book) and the fields that should be included in the serialized data. The special value ‘all’ tells DRF to include all fields of the model in the serializer.
Now that we have defined our BookSerializer, we can use it to serialize and deserialize Book objects in our views. For example, to serialize a Book object and return it as JSON, we can do the following in a view function:

In this example, we define a new view function called ‘book_detail’, which returns a single Book object serialized as JSON. We use the BookSerializer to serialize the Book object, and then return the serialized data in a Response object.
In conclusion, ModelSerializers are a powerful tool provided by Django Rest Framework that allow for simpler serialization and deserialization of data related to a Django model. By using a ModelSerializer, you can avoid writing code to define each field of the serialized data manually, and let DRF handle the serialization for you.
3: Authentication and Permissions
In the world of web applications, security is of paramount importance. Django Rest Framework provides several tools to help secure your API endpoints and ensure that only authorized users can access them. In this chapter, we will explore two important concepts in web security: authentication and permissions.
Authentication is the process of verifying the identity of a user or system. In the context of web applications, this typically involves verifying a user’s username and password, or some other form of credentials. Django Rest Framework provides several authentication methods out of the box, and also allows you to create your own custom authentication methods.
Permissions, on the other hand, control what actions a user can perform on a given resource. For example, you may want to allow only authenticated users to view or modify certain resources, or you may want to restrict access to certain resources based on a user’s role or group. Django Rest Framework provides several permission classes that you can use to control access to your API endpoints, and also allows you to create your own custom permission classes.
In this section, we will explore the various authentication and permission classes provided by Django Rest Framework, and learn how to use them to secure our API endpoints. We will also discuss best practices for securing web applications, and cover common security vulnerabilities and how to avoid them. By the end of this chapter, you will have a solid understanding of how to secure your Django Rest Framework API endpoints, and be able to implement best practices to ensure the security of your web application.
Types of authentication
Django Rest Framework provides several built-in authentication methods that you can use to secure your API endpoints. Here are some of the most commonly used authentication methods:
TokenAuthentication: This authentication method uses a token-based system to authenticate users. When a user logs in to your application, they are issued a unique token, which they can use to authenticate themselves in subsequent requests. Token authentication is stateless, meaning that the server does not need to keep track of the user’s authentication status.
BasicAuthentication: This authentication method uses HTTP basic authentication to authenticate users. When a user logs in to your application, they are prompted to enter their username and password. The server then sends an HTTP response with a 401 Unauthorized status code, along with a challenge to authenticate using HTTP basic authentication. The user’s browser then sends the username and password in base64-encoded format with each subsequent request.
SessionAuthentication: This authentication method uses Django’s built-in session framework to authenticate users. When a user logs in to your application, their credentials are stored in the session data. Subsequent requests from the user’s browser include a session cookie, which the server can use to authenticate the user.
JSONWebTokenAuthentication: This authentication method uses JSON Web Tokens (JWTs) to authenticate users. When a user logs in to your application, they are issued a JWT, which contains encoded information about the user’s identity and authentication status. The user’s browser sends the JWT with each subsequent request, and the server can use the JWT to authenticate the user.
In addition to these built-in authentication methods, Django Rest Framework also allows you to create your own custom authentication methods. This can be useful if you need to implement a specific authentication workflow that is not covered by the built-in authentication methods.
Implementing authentication in Django Rest Framework
Django Rest Framework provides a number of authentication classes that can be used tosecure your API endpoints. To use authentication in Django Rest Framework, you’ll need to specify one or more authentication classes in your view or viewset. Here’s an example of how to specify authentication classes in a view:
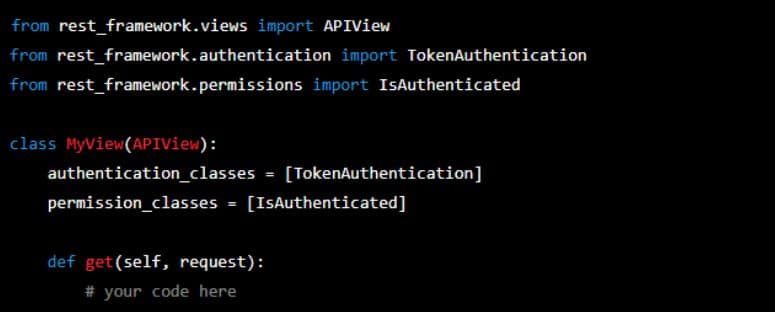
In this example, we’re using the TokenAuthentication authentication class, which authenticates users using a token-based system. We’re also using the IsAuthenticated permission class, which ensures that only authenticated users can access this view. Django Rest Framework provides several other authentication classes that you can use, including BasicAuthentication, SessionAuthentication, and JSONWebTokenAuthentication. You can specify multiple authentication classes if you need to support multiple authentication methods.
To use token-based authentication, you’ll need to create a token for each user in your system. Django Rest Framework provides a built-in Token model that you can use to store tokens. Here’s an example of how to create a token for a user:

This code creates a new token for the user with the username myuser. The Token object has a key attribute, which is the token that you’ll need to include in your requests to authenticate the user.
To authenticate a user in a view, you’ll need to check the authentication credentials provided in the request. Here’s an example of how to do this with token-based authentication:

In this example, we’re using the TokenAuthentication authentication class and the IsAuthenticated permission class to ensure that only authenticated users can access this view. The request.user attribute contains the user object for the authenticated user.
By using Django Rest Framework’s built-in authentication classes and permission classes, you can easily secure your API endpoints and ensure that only authorized users can access them.
Types of permissions in the Django REST Framework
Django Rest Framework provides several built-in permission classes that you can use to control access to your API endpoints. Here are some of the most commonly used permission classes:
AllowAny: This permission class allows any user, authenticated or not, to access the view.
IsAuthenticated: This permission class only allows authenticated users to access the view.
IsAdminUser: This permission class only allows admin users to access the view.
IsAuthenticatedOrReadOnly: This permission class allows authenticated users to perform any action on the view, but allows read-only access to unauthenticated users.
DjangoModelPermissions: This permission class uses the Django ORM to determine whether a user has the necessary permissions to access the view based on the model’s permissions.
DjangoObjectPermissions: This permission class uses the Django ORM to determine whether a user has the necessary permissions to access a specific object based on the model’s ermissions.
To use a permission class, you’ll need to specify it in your view or viewset. Here’s an example of how to use the IsAuthenticated permission class:

In this example, we’re using the IsAuthenticated permission class, which only allows authenticated users to access this view. You can also use multiple permission classes by specifying them in a list. Django Rest Framework will check each permission class in the list and only allow access if all of the classes pass. Here’s an example of how to use multiple permission classes:

In this example, we’re using both the IsAuthenticated and IsAdminUser permission classes,which only allows authenticated admin users to access this view. By using Django Rest Framework’s built-in permission classes, you can easily control access to your API endpoints and ensure that only authorized users can perform certain actions on your API resources.
Implementing permissions in Django Rest Framework
Django Rest Framework provides a variety of built-in permission classes, which can be used to restrict access to your API endpoints. However, sometimes you may need to create your own custom permission classes to handle more complex scenarios. Here’s how you can implement your own custom permission classes in Django Rest Framework.
To create a custom permission class, you need to inherit from the BasePermission class and implement the has_permission() and/or has_object_permission() methods.
has_permission() is called to determine if a user has permission to access a view, while has_object_permission() is called to determine if a user has permission to perform a specific action on a specific object. For example, you may want to allow a user to edit their own posts but not other users’ posts.
Here’s an example of a custom permission class that only allows users to access a view if they have the is_admin flag set to True in their user profile:

In this example, we’re creating a custom permission class called IsAdminUser, which checks if the user is authenticated and has the is_admin flag set to True in their profile.
You can then use this custom permission class in your views or viewsets:

In this example, we’re using the IsAdminUser permission class to restrict access to the MyView view. Only users who have the is_admin flag set to True in their profile will be allowed to access this view. You can also combine multiple permission classes by using the & (and) operator or the | (or) operator. For example:
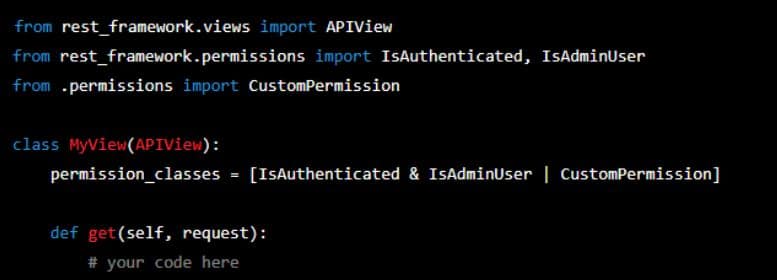
In this example, we’re using the IsAuthenticated and IsAdminUser built-in permission classes, as well as a custom permission class called CustomPermission. Only users who are both authenticated and admins, or who pass the CustomPermission check, will be allowed to access this view.
4: Views and ViewSets
In the previous chapters, we discussed how to create a basic API view and how to use serializers and permissions to customize the behavior of our API. In this chapter, we will explore views and viewsets in more detail.
Views and viewsets are the heart of any Django Rest Framework application. They handle incoming requests, process the data, and return the appropriate response. Views and viewsets can be used to create CRUD (Create, Retrieve, Update, Delete) operations for our models, as well as handle custom actions that do not map to CRUD operations.
Django Rest Framework provides several different types of views and viewsets that we can use depending on the requirements of our application. In this chapter, we will explore these different types of views and viewsets, and learn how to use them to create a powerful and flexible API. We will also learn how to use routers to automatically generate URLs for our views and viewsets, and how to customize the URLs to suit our needs.
Understanding views and viewsets
Views and viewsets are the core components of Django Rest Framework. They define how incoming requests are processed, data is retrieved or modified, and responses are generated. In this section, we will discuss the differences between views and viewsets and their use cases.
Views
In Django Rest Framework, views are classes or functions that handle incoming requests and return responses. Views can be used to implement simple functionality such as retrieving a list of objects or more complex functionality such as handling form submissions. Views can be created as a class-based view or as a function-based view.
Class-based views provide a more structured and reusable approach to writing views. They define methods such as get(), post(), put(), and delete() to handle different HTTP methods. Class-based views can also be extended to create custom methods for more complex functionality.
Function-based views, on the other hand, provide a simpler and more concise way of writing views. They take an incoming request as an argument and return a response. Function-based views can be useful for writing small, one-off views.
Viewsets
Viewsets are another way of defining views in Django Rest Framework. They are classes that group together common functionality for a particular model or resource. Viewsets can be used to implement CRUD operations for a model, as well as any custom actions that are required.
Django Rest Framework provides several types of viewsets, such as ModelViewSet, ReadOnlyModelViewSet, GenericViewSet, and ViewSet. These different types of viewsets provide different levels of functionality, and can be used depending on the requirements of the
application.
ModelViewSet is the most commonly used viewset, and provides all of the basic CRUD operations for a model. ReadOnlyModelViewSet is used when only read-only operations are required. GenericViewSet is a more customizable viewset that can be used to implemen
custom actions, while ViewSet is a base class that can be used to define custom functionality.
Views and viewsets are the building blocks of a Django Rest Framework application. Understanding the differences between views and viewsets, and their use cases, is essential to building a flexible and powerful API. In the next sections, we will explore the different types of views and viewsets in more detail, and learn how to use them to create a fully-featured API.
Creating views and viewsets in Django Rest Framework
In this section, we will learn how to create views and viewsets in Django Rest Framework. We will start by creating a simple view and then move on to creating a viewset.
Creating a view
To create a view in Django Rest Framework, we need to define a class that inherits from APIView. The APIView class provides methods for handling different HTTP methods such as get(), post(), put(), and delete(). Let’s create a simple view that returns a list of objects:
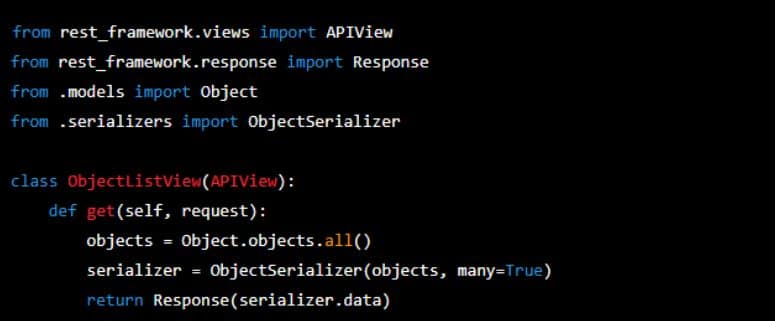
In this example, we import the APIView class, Object model, and ObjectSerializer. We define a get() method that retrieves all objects from the database, serializes them using ObjectSerializer, and returns the serialized data in the response.
Creating a viewset
To create a viewset in Django Rest Framework, we need to define a class that inherits from a base viewset class such as ModelViewSet or ReadOnlyModelViewSet. Let’s create a viewset for our Object model using ModelViewSet:

In this example, we import ModelViewSet, Object model, and ObjectSerializer. We define the queryset attribute to retrieve all objects from the database, and the serializer_class attribute to use ObjectSerializer for serialization.
The ModelViewSet class provides methods for handling CRUD operations such as list(), create(), retrieve(), update(), and destroy(). These methods are automatically generated based on the attributes defined in the viewset.
In this section, we learned how to create views and viewsets in Django Rest Framework. We created a simple view that returns a list of objects and a viewset for our Object model. Views and viewsets provide a flexible and powerful way of defining the behavior of our API. In the next section, we will learn how to use routers to automatically generate URLs for our views and viewsets.
Differences between views and viewsets
Views and viewsets are both used in Django Rest Framework to define the behavior of our API endpoints. While they share some similarities, there are some key differences between the two.
Views
Views are classes that inherit from APIView and define the behavior for a specific HTTP method such as get(), post(), put(), and delete(). They are typically used when we want to define the behavior for a specific endpoint that does not fit into the standard CRUD operations provided by Django Rest Framework. Views provide a lot of flexibility and can be used to define complex behavior for our API endpoints.
Viewsets
Viewsets are classes that inherit from a base viewset class such as ModelViewSet or ReadOnlyModelViewSet. They provide a more structured way of defining the behavior of our API endpoints. Viewsets are typically used when we want to define the standard CRUD operations for a model-based API. They generate the list(), create(), retrieve(), update(), and destroy() methods automatically based on the attributes defined in the viewset. Viewsets also provide additional methods such as partial_update() for partial updates and list() for filtering and pagination.
Advantages of using viewsets
Using viewsets provides a number of advantages over using views:
Structure: Viewsets provide a more structured way of defining the behavior of our API endpoints. They follow a standardized pattern, which makes it easier to understand and maintain our code.
CRUD operations: Viewsets generate the standard CRUD operations for a model-based API automatically. This saves us a lot of time and effort when creating our API endpoints.
Additional methods: Viewsets provide additional methods such as partial_update() for partial updates and list() for filtering and pagination. This gives us more flexibility and power when defining the behavior of our API endpoints.
In this section, we learned about the differences between views and viewsets in Django Rest Framework. Views are used to define the behavior for a specific HTTP method, while viewsets provide a more structured way of defining the behavior of our API endpoints. Viewsets generate the standard CRUD operations for a model-based API automatically and provide additional methods such as partial_update() and list() for added flexibility and power. When designing our API endpoints, we should consider the advantages of using viewsets for a more structured and efficient approach.
5: Routing and Filtering
In this chapter, we will explore the routing and filtering capabilities of Django Rest Framework. Routing allows us to map our API endpoints to the corresponding views or viewsets, while filtering enables us to query and retrieve only the data we need from our database. We will discuss the different types of routing available in Django Rest Framework and how to create custom routes. We will also look at the various types of filters available and how to implement them in our API endpoints. By the end of this chapter, you will have a strong understanding of how to effectively route and filter your API endpoints in Django Rest Framework.
Routing in Django Rest Framework
Routing is a crucial aspect of any web framework as it allows us to map our API endpoints to the corresponding views or viewsets. In Django Rest Framework, routing is handled by the urls.py file in our application. By default, Django Rest Framework provides a number of pre defined URLs for the standard CRUD operations provided by the ModelViewSet. These include:
^$ for the list view
^{pk}$ for the detail view
^{pk}/update/$ for the update view
^{pk}/delete/$ for the delete view
To use these URLs, we can simply include the router in our urls.py file and register our viewset:

This will generate the URLs for the standard CRUD operations for the MyModelViewSet.
Custom routes
Sometimes, we may want to create custom routes for our API endpoints. This can be achieved by defining the route in our urls.py file and mapping it to a specific view or viewset. For example, let’s say we want to create a custom route for a search function in our API. We can define the route in our urls.py file:

We can then create the corresponding view for this route:
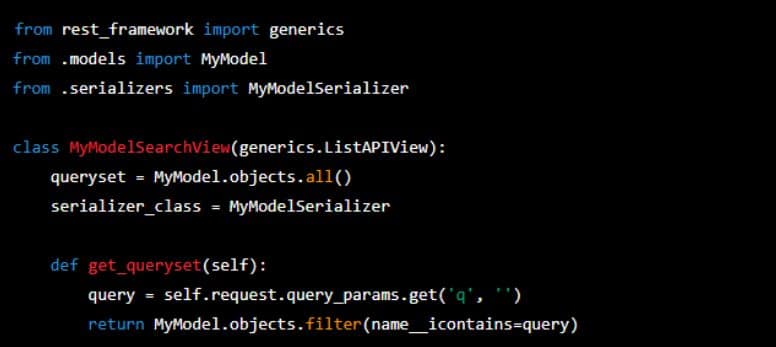
In this example, we have created a custom route for searching MyModel instances by name. The MyModelSearchView extends ListAPIView and provides a custom implementation of the get_queryset() method to filter the instances by name.
In this section, we learned about the routing capabilities of Django Rest Framework. We discussed the default URLs generated by the router for the standard CRUD operations and how to create custom routes. By defining custom routes, we can create more complex API endpoints to handle specific use cases in our application. Routing is an essential part of building a RESTful API and with Django Rest Framework, it is made easy and intuitive.
Filtering results in Django Rest Framework
In most APIs, it is common to allow users to filter the results returned by an endpoint. Django Rest Framework provides a flexible and powerful filtering system that makes it easy to implement filtering in our APIs.
Filtering basics
Django Rest Framework provides a set of filter backends that we can use to implement filtering in our API views or viewsets. These filter backends work by inspecting the request query parameters and applying the specified filters to the queryset before it is serialized.
To use a filter backend, we need to include it in the filter_backends attribute of our view or viewset:
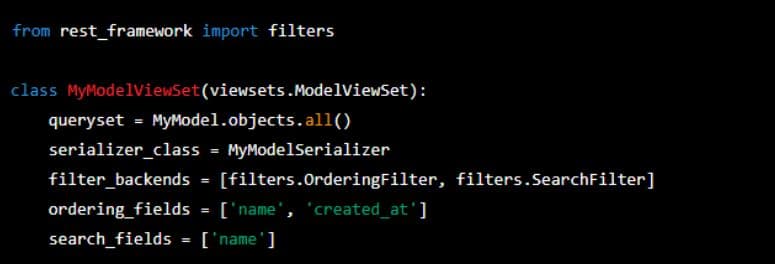
In this example, we have included two filter backends: OrderingFilter and SearchFilter. We have also defined the ordering_fields and search_fields attributes to specify the fields that we want to use for ordering and searching. Now, if we make a request to our API with the ordering query parameter, the queryset will be ordered by the specified field:

Similarly, if we make a request with the search query parameter, the queryset will be filtered to include only instances that match the search query:
![]()
Custom filtering
Sometimes, the built-in filter backends may not be sufficient for our needs. In such cases, we can create custom filter backends by extending the rest_framework.filters.BaseFilterBackend class.
For example, let’s say we want to create a custom filter backend that allows us to filter MyModel instances by a related model. We can create a custom filter backend like this:

In this example, we have created a custom filter backend called RelatedModelFilterBackend. The filter_queryset() method is called to apply the filter to the queryset. Here, we are checking if the related_id query parameter is present and if so, we are filtering the queryset to include only instances that have a related model with the specified ID.
In this section, we learned how to implement filtering in our APIs using Django Rest Framework. We discussed the built-in filter backends provided by Django Rest Framework and how to create custom filter backends. With Django Rest Framework, we can easily implement powerful filtering in our APIs to allow users to query and retrieve only the data they need.
Combining filters for more complex queries
Django Rest Framework provides a powerful filtering system that allows developers to filter the results of a query based on a variety of criteria. In addition to basic filters such as exact, contains, and startswith, DRF also provides more advanced filters such as range and ordering.
One of the strengths of DRF’s filtering system is the ability to combine multiple filters to create more complex queries. For example, you might want to retrieve all objects that match a certain value for a particular field, but only if they were created within the last week.
To accomplish this, you can use the “&” and “|” operators to combine multiple filters. The “&” operator represents a logical AND, while the “|” operator represents a logical OR.
Here’s an example:
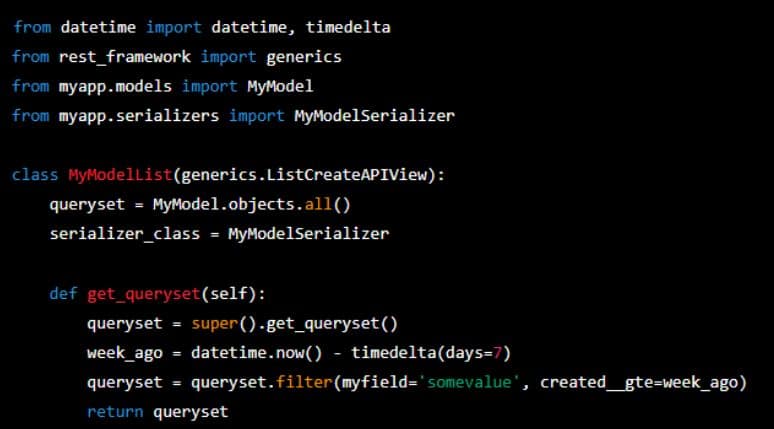
In this example, we’re defining a view that retrieves all objects of type MyModel that have a value of “somevalue” for the “myfield” field and were created within the last week. We’re accomplishing this by combining two filters using the “&” operator.
Note that we’re overriding the get_queryset() method to add the extra filter. This is necessary because we’re not simply filtering based on a URL parameter or some other input – we’re using a dynamic value (the current date) to generate the filter. By combining filters in this way, you can create complex queries that retrieve only the data you need. This can be especially useful when dealing with large datasets where retrieving all the data at once would be impractical or inefficient.
6: Pagination and Throttling
In this section, we will discuss two important features of Django Rest Framework – Pagination and Throttling. These features can improve the performance of your API by controlling the amount of data that is sent to the client and the rate at which requests are processed.
Pagination is a technique that splits a large set of data into smaller, more manageable chunks. This can help reduce the amount of data that needs to be transferred over the network, and improve the performance of the API. Django Rest Framework provides built-in support for pagination, and we’ll show you how to use it to paginate the results of your API.
Throttling, on the other hand, is a technique that limits the rate at which requests can be made to an API. This can help prevent abuse and ensure that the API remains responsive for all users. Django Rest Framework also provides built-in support for throttling, and we’ll show you how to use it to control the rate at which requests are processed.
By the end of this chapter, you’ll have a solid understanding of how to use pagination and throttling in Django Rest Framework to improve the performance and security of your API.
Controlling API response size with pagination
When working with large datasets, it’s important to control the amount of data that is returned to the client to prevent overwhelming the client application or network. Pagination is the process of dividing large sets of data into smaller, more manageable pages.
Django Rest Framework provides several built-in pagination classes that you can use to paginate the results of your API. These classes include PageNumberPagination, LimitOffsetPagination, and CursorPagination.
PageNumberPagination is the simplest pagination style and it is based on page numbers. It allows the client to navigate through pages by providing a page number as a query parameter in the URL. For example, http://example.com/api/users/?page=2 would return the second page of results.
LimitOffsetPagination is another style of pagination that allows clients to specify the number of results they want to receive and the offset from which to start. For example, http://example.com/api/users/?limit=20&offset=40 would return the 20 results starting at index 40.
CursorPagination is a style of pagination that uses a cursor, which is essentially a unique identifier for each item in the result set, to navigate through pages. The cursor can be a date, a primary key or any other field that is unique to each item.
To use pagination in your views or viewsets, you simply need to specify the pagination class you want to use. For example:

With this code, the results of the User queryset will be paginated using the PageNumberPagination class. In addition to the built-in pagination classes, Django Rest Framework also allows you to create custom pagination classes that meet the specific needs of your application. This can be useful if you have unique requirements, such as a custom sort order or a specific page size.
In summary, pagination is an important feature in Django Rest Framework that can help improve the performance of your API by controlling the amount of data that is returned to the client. By using one of the built-in pagination classes or creating a custom one, you can provide a better user experience and make your API more efficient.
Implementing pagination in Django Rest Framework
To implement pagination in Django Rest Framework, you need to define a pagination class and then specify that class in your views or viewsets. Here’s an example:

In this example, we’ve created a custom pagination class called CustomPagination that extends the PageNumberPagination class. We’ve set the page_size attribute to 10, which means that each page will contain 10 results. We’ve also set the page_size_query_param attribute to ‘page_size’, which means that clients can override the default page size by specifying the page_size query parameter in the URL. Finally, we’ve set the max_page_size attribute to 100, which means that clients cannot request more than 100 results per page.
To use this pagination class in your views or viewsets, you simply need to specify it as the pagination_class attribute. For example:

With this code, the results of the User queryset will be paginated using the CustomPagination class. Django Rest Framework provides several built-in pagination classes that you can use instead of creating a custom class. These classes include:
PageNumberPagination: paginates results based on page number
LimitOffsetPagination: paginates results based on a limit and an offset
CursorPagination: paginates results based on a cursor
You can use these classes by specifying them as the pagination_class attribute in your views or viewsets.
In summary, pagination is an important feature of Django Rest Framework that allows you to control the amount of data that is returned to the client. By creating a custom pagination class or using one of the built-in classes, you can provide a better user experience and make your API more efficient.
Throttling to protect your API from excessive requests
Throttling is an important feature of Django Rest Framework that allows you to protect your API from excessive requests by limiting the rate at which clients can make requests. Throttling helps to prevent abuse and ensure that your API is available to all clients.
Django Rest Framework provides several built-in throttling classes that you can use to limit the rate of requests. These classes include:
AnonRateThrottle: limits the rate of requests for unauthenticated clients
UserRateThrottle: limits the rate of requests for authenticated clients
ScopedRateThrottle: limits the rate of requests based on a specific scope, such as an endpoint or a group of endpoints
You can use these classes by specifying them in your Django Rest Framework settings. For example, to enable throttling for unauthenticated clients and limit the rate to 100 requests per day, you can add the following to your settings:

This code specifies the AnonRateThrottle class as the default throttling class for unauthenticated clients, and sets the rate to 100 requests per day. You can also specify different throttling classes and rates for authenticated clients and for different scopes.
Django Rest Framework also provides a ScopedRateThrottle class that allows you to define throttling rates for specific scopes. For example, to limit the rate of requests for a specific endpoint to 10 requests per hour, you can add the following to your view:

This code specifies the ScopedRateThrottle class as the throttling class for this view, and sets the scope to ‘my-endpoint’. You can then define the throttling rate for this scope in your Django Rest Framework settings:
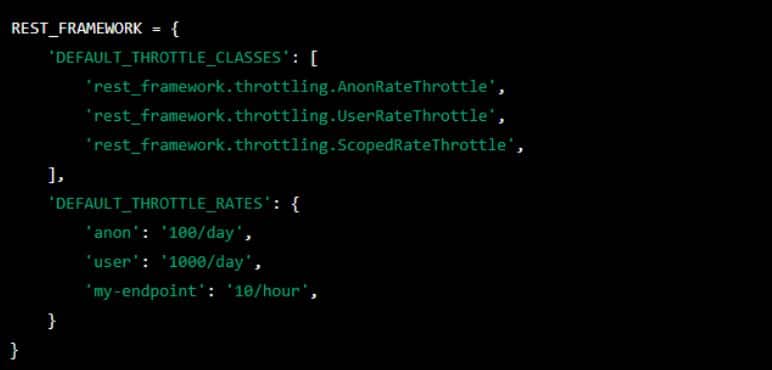
This code specifies the ScopedRateThrottle class as one of the default throttling classes, and sets the throttling rate for the ‘my-endpoint’ scope to 10 requests per hour.
In summary, throttling is an important feature of Django Rest Framework that allows you to protect your API from excessive requests by limiting the rate at which clients can make requests. By using the built-in throttling classes and specifying the appropriate rates for your API, you can prevent abuse and ensure that your API is available to all clients.
7: Nested Relationships and Hyperlinked APIs
In this section, we will explore two advanced concepts in Django Rest Framework – nested relationships and hyperlinked APIs. Nested relationships allow you to represent relationships between models in a nested structure, making it easier to work with related data. This can be especially useful when dealing with complex data structures or when creating APIs that need to be consumed by multiple clients.
Hyperlinked APIs, on the other hand, use URLs to represent relationships between resources, rather than using primary keys. This can make APIs more flexible and easier to maintain over time.
By the end of this section, you will have a solid understanding of both nested relationships and hyperlinked APIs, as well as how to implement them in your own Django Rest Framework projects.
Defining relationships between models
In Django Rest Framework, you can define relationships between models in order to represent how they are related to each other. This is useful when you want to work with related data or create APIs that expose relationships between resources.
There are several types of relationships you can define in Django Rest Framework:
One-to-one relationship: This is a relationship where each instance of a model is associated with exactly one instance of another model. To define a one-to-one relationship, you can use the OneToOneField.
One-to-many relationship: This is a relationship where each instance of a model can be associated with one or more instances of another model. To define a one-to-many relationship, you can use the ForeignKey field.
Many-to-many relationship: This is a relationship where each instance of a model can be associated with one or more instances of another model, and vice versa. To define a many-to-many relationship, you can use the ManyToManyField.
Once you have defined the relationships between your models, you can use them in your serializers to create nested representations of your data. For example, if you have a model representing a book and another model representing an author, you can define a ForeignKey relationship between them so that each book is associated with one author. Then, in your serializer for the book model, you can include a nested representation of the author model, allowing you to retrieve information about the author along with the book data.
Serializing nested relationships
In Django Rest Framework, you can use serializers to create nested representations of your data, including relationships between models. This allows you to retrieve related data along with your main data, without having to make additional requests.
To serialize nested relationships, you can define a serializer for each related model and include it in the serializer for your main model. For example, if you have a model representing a book and another model representing an author, you can define a serializer for each model:
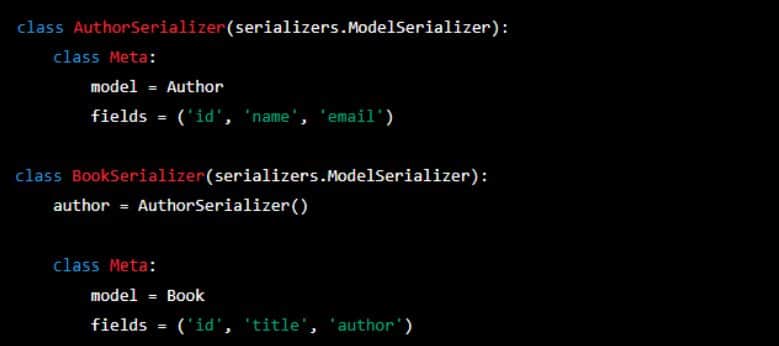
In this example, the BookSerializer includes an instance of the AuthorSerializer as a field. When the BookSerializer is used to serialize a book object, it will automatically serialize the associated author object as well, using the AuthorSerializer.
You can also use nested serializers to create more complex representations of your data. For example, if you have a model representing a library, which contains many books, and each book is associated with an author, you can define a serializer for each related model:
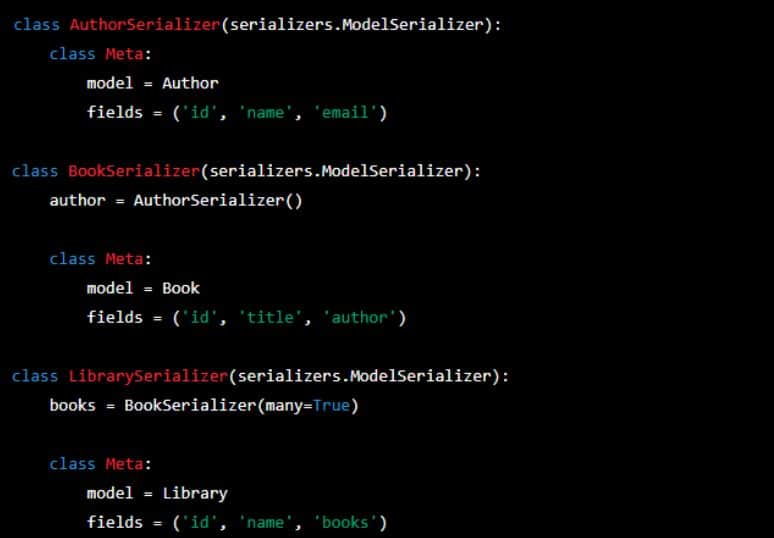
In this example, the LibrarySerializer includes an instance of the BookSerializer as a field, which itself includes an instance of the AuthorSerializer. When the LibrarySerializer is used to serialize a library object, it will automatically serialize all associated book and author objects as well, creating a nested representation of the data.
Using nested serializers allows you to create complex representations of your data in a single request, reducing the number of requests required to retrieve all the necessary data. However, be aware that including too much data in a single request can lead to performance issues, so it’s important to use pagination and other techniques to optimize your API performance.
Creating hyperlinked APIs
In Django Rest Framework, Hyperlinked APIs are an alternative approach to representing relationships between different models in your API. In this approach, instead of embedding related objects within the response payload, we provide links to the related objects.
Hyperlinked APIs are useful when you want to minimize the size of the response payload and reduce duplication of data. The server sends only the URL to the related resource, and the client can follow the link to retrieve the resource if needed.
To create a hyperlinked API, we need to create serializers that inherit from serializers.HyperlinkedModelSerializer instead of serializers.ModelSerializer. We also need to use a different type of serializer field called HyperlinkedRelatedField instead of PrimaryKeyRelatedField.
Here’s an example of a hyperlinked serializer for the Comment model, which has a foreign key relationship to the Post model:
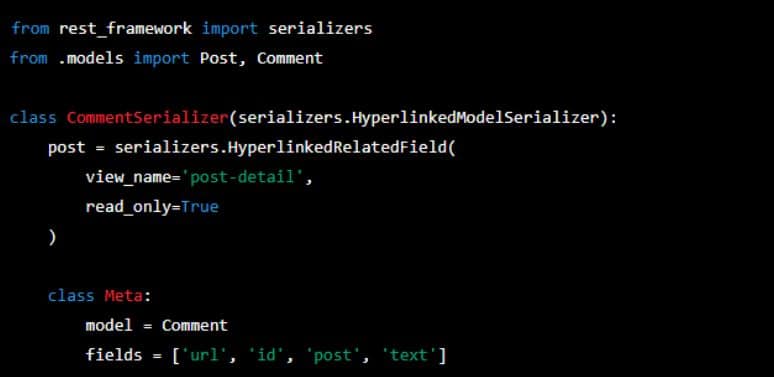
In this example, we define a HyperlinkedRelatedField for the post field, which includes the view_name parameter that specifies the URL pattern name for the related Post object. We also set read_only=True to indicate that this field is not required when creating or updating a comment.
We can then use this serializer in our view to return a hyperlinked representation of the comments:

When we retrieve a comment using this view, we will get a response that looks like this:

In this example, the post field includes a URL to the related Post object instead of embedding the full Post object in the response payload.
8: Customizing Responses and Error Handling
In this section , we will delve into customizing the responses and error handling of our APIs. By default, Django Rest Framework provides us with sensible default behavior for response and error handling. However, sometimes we need to customize the response data format, or provide additional information in the error messages.
We will explore how to customize our responses using content negotiation, custom renderers, and response mixins. We will also dive into handling errors in Django Rest Framework using custom exception handlers, serializer error handling, and status codes. Let’s get started!
Customizing response formats
Django Rest Framework provides us with a default format for our responses, which is usually JSON. However, there may be situations where we need to customize our response format to meet specific requirements. For example, we may want to provide a CSV or XML response format for our clients.
Fortunately, Django Rest Framework allows us to customize our response format using content negotiation. Content negotiation is the process of selecting the best representation of a resource based on the client’s requested format. Django Rest Framework provides content negotiation out of the box, and it supports various formats such as JSON, XML, HTML, and others.
To customize our response format, we need to implement a custom renderer. A renderer is responsible for converting the Python data into a specific format. We can create a custom renderer by subclassing the BaseRenderer class and overriding the render method to return our desired format.
Here’s an example of a custom renderer that returns a CSV response format:
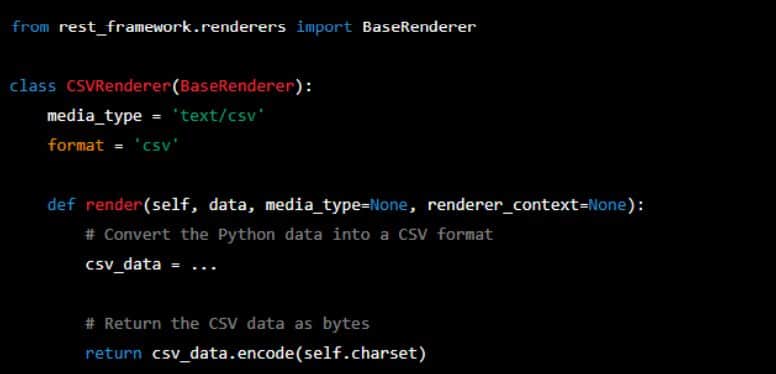
Now, when a client requests a CSV response format, Django Rest Framework will use our custom renderer to convert the response data into CSV format.
In summary, we can customize our response format in Django Rest Framework using content negotiation and custom renderers. By implementing a custom renderer, we can support additional response formats such as CSV or XML to meet specific requirements.
Handling errors and exceptions
Handling errors and exceptions is a crucial aspect of any API development process, as it ensures that the API can respond gracefully to unexpected situations and provide meaningful feedback to clients.
Django Rest Framework provides several ways to handle errors and exceptions in your API, including:
Custom exception handling: You can define custom exception handlers to catch and process exceptions thrown by your API views. This allows you to define how errors are reported back to clients, and can include things like custom error messages, HTTP response codes, and more.
Customizing response formats: DRF allows you to customize the format of your API responses to match your specific needs. This includes the ability to define custom error response formats, including the structure of error messages and HTTP response codes.
API views and mixins: DRF provides several API views and mixins that can be used to handle common error scenarios, such as permission errors or invalid input data. These views and mixins provide a standard way to handle errors, making it easier to maintain consistent error handling across your entire API.
Debugging tools: DRF also includes several debugging tools that can help you identify and diagnose errors in your API code. This includes detailed error logs, stack traces, and more.
By taking advantage of these features, you can ensure that your API is robust and reliable, and that it provides a consistent and user-friendly experience to clients.
Creating custom error responses
In Django Rest Framework, you can customize the error responses returned by your API in case of errors or exceptions. This allows you to provide more meaningful and informative error messages to your clients.
To create a custom error response, you can define a custom exception handler function. This function should take two arguments: the exception that was raised, and the context of the exception.
Here’s an example of how to define a custom exception handler function:
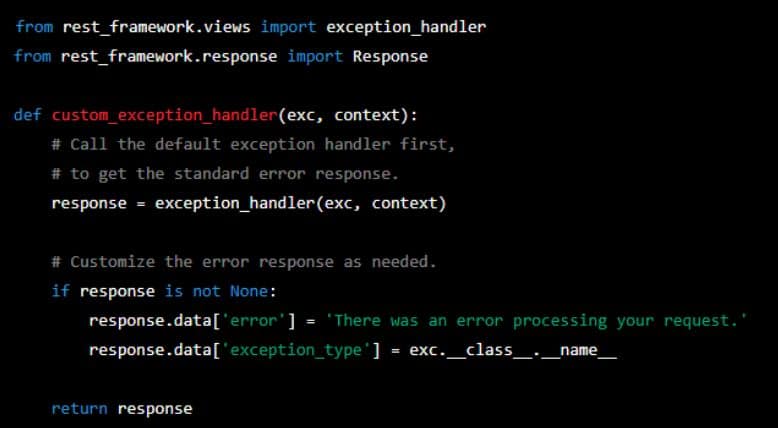
In this example, the custom_exception_handler function first calls the default exception_handler function to get the standard error response. It then adds additional data to the error response, such as a custom error message and the name of the exception that was raised.
To use your custom exception handler, you need to add it to your project’s settings file. Here’s an example of how to do this:

In this example, the EXCEPTION_HANDLER setting is set to the fully-qualified name of the custom_exception_handler function.
With this in place, any exceptions raised by your API views will be handled by your custom exception handler, allowing you to provide customized error responses to your clients.
9: Testing Your APIs
Testing is an essential part of software development, and Django REST Framework provides a robust testing framework to help you ensure that your API endpoints work as expected. In this chapter, we will cover the basics of testing in Django REST Framework, including writing unit tests, integration tests, and API tests. We will also look at some of the common testing scenarios you may encounter while developing your APIs and how to test them effectively. By the end of this chapter, you will have a good understanding of how to test your APIs and ensure that they are working correctly.
The importance of testing
Testing is a critical part of software development, and it’s essential to ensure that your code is working correctly and meets the requirements of your users. Testing helps you catch bugs and errors in your code before they cause problems for your users, which can save you a lot of time and money in the long run.
Django REST Framework provides a powerful testing framework that allows you to write comprehensive tests for your API endpoints. With the testing framework, you can ensure that your API is working correctly and that it meets the requirements of your users.
By writing tests, you can also ensure that any changes you make to your API don’t break existing functionality. This is especially important in large projects where changes to one part of the code can have unintended consequences elsewhere. Testing helps you catch these issues before they become major problems.
In summary, testing is a crucial part of software development that helps ensure your code is working correctly and meets the requirements of your users. Testing also helps you catch bugs and errors early, saving you time and money in the long run.
Writing tests for your APIs
When it comes to writing tests for your APIs in Django REST Framework, there are several options available to you. The most common approach is to use the built-in testing framework provided by Django.
To get started with testing your APIs, you’ll first need to create a test suite. This is a collection of tests that you can run to ensure that your code is working correctly. In Django, you can create a test suite by creating a new file in your app’s tests directory and adding your tests to it.
Here’s an example of a basic test suite for an API endpoint:
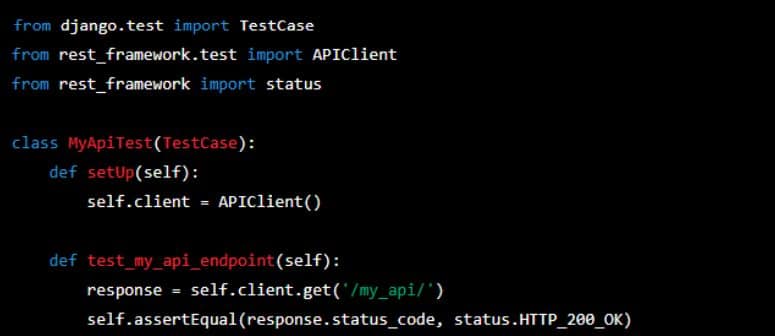
In this example, we’re creating a new test suite called MyApiTest and defining a single test called test_my_api_endpoint. In the test, we’re using the APIClient provided by Django REST Framework to make a GET request to our API endpoint, /my_api/. We then use the assertEqual method to ensure that the response status code is HTTP_200_OK, indicating that the request was successful.
This is just a basic example, but you can add as many tests as you need to ensure that your API is working correctly. You can test various types of requests, test for different response codes, and test different scenarios to ensure that your API is robust and reliable.
In addition to the built-in testing framework, Django REST Framework also provides a number of helper classes and methods that you can use to make testing your APIs easier. For example, the APITestCase class provides some additional helper methods for making requests and testing responses.
Overall, testing your APIs is an essential part of ensuring that your code is working correctly and meeting the requirements of your users. By creating a comprehensive test suite and testing your API thoroughly, you can catch bugs and errors early and ensure that your API is reliable and robust.
Using Django Rest Framework test utilities
Django Rest Framework provides test utilities to make it easy to write tests for your APIs. These test utilities help you create test cases that simulate requests to your API endpoints, so you can test how your API responds to various scenarios.
One of the key test utilities provided by Django Rest Framework is the APIClient class. This class allows you to simulate requests to your API endpoints, and inspect the responses returned by your API. The APIClient class provides methods for making GET, POST, PUT, PATCH, and DELETE requests, and also provides helper methods for authenticating requests and setting headers.
To use the APIClient, you first need to create a test case that extends Django Rest Framework’s APITestCase class. This class provides a number of useful methods for setting up your test environment, such as creating test users and test data.
Here’s an example test case that uses the APIClient to test a basic API endpoint:

In this test case, we’re making a GET request to the /api/my-models/ endpoint, and using the assertEqual method to verify that the response status code is 200.
You can also use Django Rest Framework’s APIClient to test more complex scenarios, such as authenticated requests, requests with custom headers, and requests with query parameters. Here’s an example that shows how to test an authenticated API endpoint:
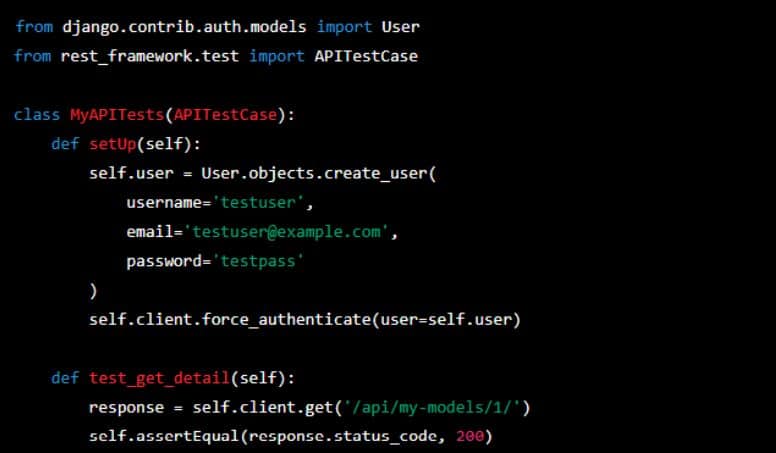
In this test case, we’re first creating a test user using Django’s built-in User model. We then use the force_authenticate method to authenticate the APIClient with the test user’s credentials. Finally, we make a GET request to the /api/my-models/1/ endpoint, which requires authentication, and use assertEqual to verify that the response status code is 200.
By using Django Rest Framework’s test utilities, you can write comprehensive tests for your APIs that verify how they respond to various scenarios, and catch potential issues before they make it to production.
10: Advanced Topics.
So far, we’ve covered a wide range of topics related to building APIs using Django REST Framework, including installation and setup, serializers, authentication and permissions, views and viewsets, routing and filtering, pagination and throttling, nested relationships and hyperlinked APIs, and customizing responses and error handling.
In this section, we’ll delve into some advanced topics that will take your API development skills to the next level. We’ll cover topics such as customizing authentication, implementing third-party libraries, creating custom renderers, handling asynchronous requests, and using caching. These topics are essential to creating complex and efficient APIs that meet the needs of modern web and mobile applications.
Whether you’re a seasoned Django developer or a newcomer to the framework, the skills and knowledge you gain from this chapter will help you create APIs that are powerful, scalable, and secure. So let’s get started!
Working with third-party packages
Django Rest Framework provides a comprehensive set of tools for building robust APIs. However, sometimes you may need additional functionality that is not available out of the box. That’s where third-party packages come in.
There are a variety of third-party packages available that can help you extend the functionality of your API. These packages range from simple utilities for formatting responses to complex authentication and authorization frameworks.
In this section, we will explore some popular third-party packages that can enhance the capabilities of your Django Rest Framework API. We will discuss the benefits and drawbacks of each package, as well as how to integrate them into your project. By the end of this chapter, you will have a good understanding of the available third-party packages and how to use them to improve your API.
Caching and performance optimization
One of the most important considerations when building APIs is performance. APIs that are slow or unresponsive can lead to frustrated users and lost revenue. Fortunately, Django Rest Framework provides several tools for caching and performance optimization.
Caching is a technique for storing frequently accessed data in memory, so that it can be quickly retrieved when needed. By caching frequently accessed data, you can significantly reduce the load on your database and improve the response time of your API.
Django Rest Framework provides several built-in caching classes that you can use to cache your API responses. These classes allow you to cache responses at the view level or the global level. By caching your responses, you can dramatically improve the performance of your API.
In addition to caching, there are several other performance optimization techniques that you can use to improve the speed of your API. These include minimizing database queries, using pagination, and optimizing your database schema.
By implementing these techniques, you can ensure that your API is fast and responsive, even under heavy load. This will help to ensure that your users have a positive experience and that your API is able to scale to meet the demands of your growing user base.
Versioning and backwards compatibility
Versioning and backwards compatibility are important concepts to consider when developing APIs, especially in a fast-paced development environment where changes can happen frequently. As your API evolves and changes, you want to make sure that existing clients can continue to function without any major disruptions.
Versioning is the process of assigning a version number to your API to indicate changes and updates. When you make a change to your API, you can release a new version that reflects the changes made. This allows you to make changes without breaking existing clients that rely on your API.
There are a few ways to version your API in Django Rest Framework, including:
URL versioning: In URL versioning, you add the version number to the URL. For example, you might have an endpoint that looks like api/v1/users/.
Header versioning: In header versioning, you add the version number to the HTTP headers. This can be useful if you want to keep your URLs clean and concise.
Query parameter versioning: In query parameter versioning, you add the version number as a query parameter in the URL. For example, you might have an endpoint that looks like /api/users/?version=1.
Backwards compatibility is the ability of your API to continue functioning properly even as new versions are released. This means that any clients that rely on your API should still be able to make requests and receive responses, even as you make changes to the API. Backwards compatibility can be achieved through careful planning and testing, and by using versioning to clearly indicate changes and updates.
When making changes to your API, it’s important to consider how those changes might impact existing clients. You should communicate any changes or updates clearly, and provide documentation and support to help clients adapt to new versions. By being mindful of versioning and backwards compatibility, you can help ensure that your API remains a reliable and valuable resource for your clients.
11: Deploying Your API
After building and testing your API, the next important step is to deploy it for public use. Deploying an API involves setting up a server, configuring it, and making it available over the internet. Django REST Framework provides developers with several tools to make the deployment process smooth and seamless. In this section, we will discuss various ways to deploy your Django REST Framework API, including the following:
- Deploying on a cloud platform like AWS, Google Cloud Platform, or Microsoft Azure
- Deploying on a dedicated server or virtual private server (VPS)
- Deploying using containerization technologies like Docker and Kubernetes
- Configuring a web server like Nginx or Apache for your API
- Implementing HTTPS and SSL/TLS encryption for secure communication
We will also discuss best practices for maintaining and monitoring your API in production, including setting up logging, error tracking, and performance monitoring.
Preparing your API for deployment
Before deploying your API, there are several things you need to consider and prepare. Here are some key steps to take:
Choose a deployment platform: There are several deployment platforms available for Django applications, including cloud services like AWS and Heroku, as well as traditional web hosts.
Configure your environment: Once you have chosen a deployment platform, you will need to configure your environment by installing necessary dependencies, setting up a database, and configuring environment variables.
Secure your API: It’s important to take steps to secure your API, such as using HTTPS, configuring secure passwords, and limiting access to sensitive data.
Test your API: Before deploying your API, make sure to thoroughly test it to ensure that it is functioning as expected and there are no bugs.
Monitor your API: Once your API is deployed, it’s important to monitor its performance and usage to identify any issues and make necessary optimizations.
By taking these steps, you can ensure that your API is ready for deployment and will provide reliable and secure service to your users.
Deploying with Docker
Deploying your Django Rest Framework API with Docker can be an efficient way to package and distribute your application, making it easy to deploy in different environments without worrying about dependencies or compatibility issues.
Docker is a containerization platform that allows you to package your application code and dependencies into a portable container, which can be easily deployed on any platform that supports Docker. This eliminates the need for manual installation of dependencies and makes it easier to manage and deploy your application.
To deploy your Django Rest Framework API with Docker, you will need to create a Docker image that contains your application code and all the dependencies required to run your API. You can then use this Docker image to spin up containers running your API on any Docker-enabled platform.
There are different ways to create a Docker image for your Django Rest Framework API, but one popular method is to use a Dockerfile. A Dockerfile is a text file that contains a set of instructions for building a Docker image. In the case of a Django Rest Framework API, the Dockerfile should include instructions to install all the required dependencies, copy your application code into the container, and configure the container to run your API.
Once you have created your Docker image, you can use Docker commands to start containers running your API. You can also use Docker Compose, which is a tool for defining and running multi-container Docker applications, to manage your API deployment and orchestrate the different services required by your API.
Deploying with Docker offers several benefits, including easy portability, scalability, and flexibility. It also provides a consistent and reliable deployment process, which reduces the risk of errors and downtime. However, it requires some familiarity with Docker and containerization concepts, and may require additional setup and configuration compared to other deployment methods.
Hosting on a cloud platform
Hosting your Django REST Framework API on a cloud platform is an efficient way to make your API accessible to the public. Cloud platforms offer various benefits such as scalability, reliability, and cost-effectiveness. There are many cloud platforms available such as Amazon Web Services (AWS), Google Cloud Platform, Microsoft Azure, and more.
To deploy your API on a cloud platform, you will need to first choose a platform and create an account. Once you have created an account, you can follow the platform-specific documentation to deploy your API. In general, the deployment process involves the following steps:
- Create a virtual environment for your API and install the required dependencies.
- Set up a web server, such as Nginx or Apache, to serve your API.
- Configure the web server to forward requests to your API.
- Set up a database, if required, and configure your API to use it.
- Configure security measures such as SSL/TLS certificates and firewalls.
- Deploy your API to the cloud platform and start the server.
Cloud platforms also offer additional tools and services to enhance your API, such as monitoring, logging, and auto-scaling. With these tools, you can ensure that your API runs smoothly and can handle large amounts of traffic.
Conclusion
We have covered a range of topics, starting from the basics of installation and setup, to more advanced topics such as authentication, permissions, pagination, and deployment.
I hope this article has provided you with a comprehensive understanding of Django REST Framework and its various features. By now, you should be comfortable creating custom serializers, views, and viewsets, and implementing filtering, pagination, and throttling in your APIs. If you do like this article, share with your friend developers and communities. Keep visiting and Sharing Thanks!

